前言
前两天写了一个轮子,主要是给图片视图添加标签的,昨天在微博上艾特喵大、叶神和iOS程序犭袁,然后火了一把,首先我感谢各位对这个小小功能的关注,让我受宠若惊。效果主要是这个样子
这两天也有小伙伴私信我能不能简单的讲一下其中的原理,其实用到的知识很简单,今天我就简单地说一下原理和实现。
原理
为了方便,我们姑且称这个控件是LBTagView,他的组成主要是一个带有三角形Label、一个小圆点的UIView和CALayer逐渐放大的圆环。三角形的Label是用CAShapeLayer结合UIBezierPath画出来的,大致的原理就是这样的,下面我们来把主要的步骤实现一下。
实现
1
2
3
4
5
6
7
8
9
10
11
12
13
14
15
| - (void)triangle:(UILabel *)label
{
[label.layer.sublayers makeObjectsPerformSelector:@selector(removeFromSuperlayer)];
CGFloat angleWidth = 10;
UIBezierPath * path = [ UIBezierPath new ];
[path moveToPoint :( CGPoint ) { angleWidth , 0 }];
[path addLineToPoint :( CGPoint ) { 0, CGRectGetHeight(label.frame)/2.0}];
[path addLineToPoint :( CGPoint ) { angleWidth, CGRectGetHeight(label.frame)}];
[path addLineToPoint :( CGPoint ) { CGRectGetWidth(label.frame), CGRectGetHeight(label.frame)}];
[path addLineToPoint :( CGPoint ) { CGRectGetWidth(label.frame), 0}];
[path addLineToPoint :( CGPoint ) { angleWidth, 0}];
CAShapeLayer* mask = [CAShapeLayer layer];
mask.path = path.CGPath ;
label.layer.mask = mask;
}
|
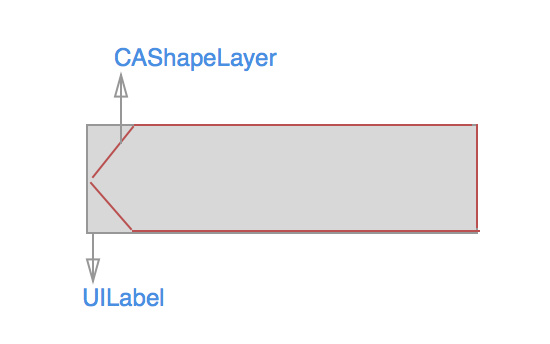
这些代码所要达到的效果大概如下,其实显示的主要是CAShapeLayer所在红框部分的内容:
1
2
3
4
5
6
7
8
9
10
11
12
13
14
15
16
17
18
| - (void)circleAnimation:(CALayer *)layer
{
CAAnimationGroup *animationGroup = [CAAnimationGroup animation];
animationGroup.repeatCount = HUGE_VALF;
[animationGroup setDuration:1];
CAMediaTimingFunction *timingFunction = [CAMediaTimingFunction functionWithName:kCAMediaTimingFunctionEaseOut];
animationGroup.timingFunction = timingFunction;
CABasicAnimation *fadeAnimation = [CABasicAnimation animationWithKeyPath:@"opacity"];
fadeAnimation.fromValue = [NSNumber numberWithFloat:0.5];
fadeAnimation.toValue = [NSNumber numberWithFloat:0];
CABasicAnimation *scaleAnimation = [CABasicAnimation animationWithKeyPath:@"transform.scale"];
scaleAnimation.fromValue = [NSNumber numberWithFloat:1];
scaleAnimation.toValue = [NSNumber numberWithFloat:5];
animationGroup.animations = [NSArray arrayWithObjects:fadeAnimation, scaleAnimation, nil];
[layer addAnimation:animationGroup forKey:@"fadeAnimation"];
}
|
这些代码主要实现的是CALayer的放大和opacity值的变化,并且是一直重复的。
LBTagView大小的确定
这个环节我设计的是在设置Label的text的时候用系统自带的方法sizeToFit来确定Label的大致大小,然后适当地放大Label的宽高,看起来比较和谐点,然后每次设置text都会把之前的CAShapeLayer删除,在重新创建新的CAShapeLayer,这就解决了LBTagView大小的问题了,也就是说我们只需要指定LBTagView的位置就行了,大小是由Font来控制的。LBTagView移动
我们需要使用到UIResponder中的方法:
1
2
| - (void)touchesBegan:(NSSet<UITouch *> *)touches withEvent:(UIEvent *)event
- (void)touchesMoved:(NSSet<UITouch *> *)touches withEvent:(UIEvent *)event
|
在touchesBegan记录一下开始的触摸点lastPoint,然后在touchesMoved获取到当前移动的点point具体代码如下:
1
2
3
4
| UITouch *touch = [touches anyObject];
CGPoint currentPint = [touch locationInView:self.superview];
self.center = CGPointMake(self.center.x + currentPint.x - lastPoint.x, self.center.y + currentPint.y - lastPoint.y);
lastPoint = currentPint;
|
为了方便的、符合自己需求的使用LBTagView我又在LBTagView.h中添加了可以修改LBTagView样式的属性,如下代码:
1
2
3
4
5
6
7
8
9
10
11
12
13
14
15
16
17
18
19
20
21
22
23
|
@property (nonatomic, assign) BOOL canMove;
@property (nonatomic, copy) NSString *text;
@property (nonatomic, strong) UIColor *textColor;
@property (nonatomic, strong) UIFont *font;
@property (nonatomic, strong) UIColor *backgroundColor;
@property (nonatomic, strong) UIColor *circlrColor;
@property (nonatomic, strong) UIColor *circlrShadowColor;
@property (nonatomic, strong) UITapGestureRecognizer *tapGestureRecognizer;
|
也就是说显示层面的都可以自定义,这样就非常方便和灵活了。
使用
使用的时候,非常简单,最低只需要三行代码就可以搞定给图片添加标签的功能了:
1
2
3
| LBTagView *tag = [[LBTagView alloc] initWithFrame:CGRectMake(50, 300, 0, 0)];
tag.text = @"hello world";
[self.view addSubview:tag];
|
小结
一个简单但是在购物平台或者自拍平台又很主流的功能就这么诞生了,功能很简单,实现也不难。通过这两天看大家在微博的转发和Github的star,我非常感谢,希望以后能写出更多好用的代码,与大家一起分享。本文Demo